Left Hand Position and Technique
Establishing strong left hand position and technique is so important. Good left hand position makes it easy for the fingers to move freely without obstruction or excess tension. Good left hand technique allows you to play accurately and smoothly every time you fret a note. When position and technique work together it gives you great confidence and allows you to enjoy playing the guitar much more compared to the feeling you get when you’re struggling to make clean notes.
Like with all aspects of guitar playing, there are many good methods, approaches and philosophies out there. This lesson is a culmination of all that I have learned and applied to my own playing. I have taken the concepts that I’ve found to be most useful, and attempted to create a concise lesson with these ideas at it’s core. If you have a different opinion, would like to elaborate on a point or feel like you can add something of value, please leave a comment at the bottom of this article.
For the purpose of this lesson, I’m assuming you are a right-handed guitarist. The left hand is therefore the fretting hand. If you are a left handed guitarist, you will need to substitute the word ‘left’ for ‘right’ throughout this article.

Left Hand Position
The fundamental position described in this lesson is great for melodic passages of music. Unfortunately it is not a ‘one size fits all’ approach. You may find that when playing some chords or making large stretches, your positioning has to change slightly. That being said, the vast majority of concepts in this lesson still remain the same, even for more complex situations. For that reason, it’s a great place to start looking at your left hand technique. I will cover stretches and chords etc in detail in another lesson.
Wrist
The first thing you should try to do is keep your wrist as straight as possible. A straight wrist allows maximum movement of the fingers. The more you bend your wrist, the more difficult it is to move your fingers and you risk damaging the hand. This is because the tendons have to pass through the carpal tunnel in the wrist. When you bend the wrist, you reduce the amount of room in the carpal tunnel. This squeezes all of the tendons and nerves together. The median nerve, which passes through the carpal tunnel, is softer than the tendons. If this nerve gets squeezed too much it can be damaged. This can cause irritating symptoms such as numbness, tingling or pain. The reduced sensation from the numbness can make it difficult to play the guitar.
Not only is it important to keep a straight wrist to avoid injury, it also makes it easier to move your fingers. You can test this idea out now by trying to wiggle your fingers with a straight wrist and then a bent wrist. Notice the difference in your range of movement? Did you also notice any discomfort, pain or tension when your wrist was bent?
Note that above I said, ‘as straight as possible’. Depending on the shape and size of your arms and hands, it may not be possible to play with a completely straight wrist. Most guitarists have to bend the wrist slightly. You should aim to find a position that allows your fingers to fret notes while maintaining a relatively straight wrist.


Additional Posture Tips
If you struggle to get your wrist into a straight enough position, try reading this article on posture. It might help to get your hand into a better position.
Using a guitar support or foot stool is also highly recommended to help achieve better position for the left hand.
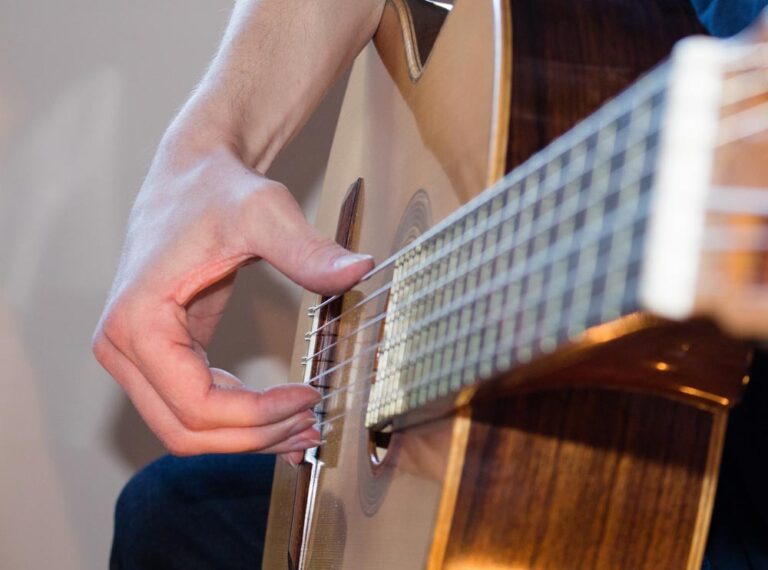
Fingertips
The best point of contact for your left hand fingers is on the fingertip. This ensures there is less chance of the finger touching another string unintentionally while fretting a note. Playing on the fingertips leaves plenty of room on either side of the fretted string. Playing on the pad of the finger (finger print) tends to make this angle more acute. When the angle is more acute than 90 degrees, there is a higher chance that you will contact a string other than the one you are fretting.
The exact part of the fingertip that should contact the guitar may be slightly different for each finger. It’s possible that not every finger will naturally contact the string on the centre of the fingertip. When you curl the fingers into the palm, the tip of each finger naturally points approximately towards the Scaphoid and Lunate bones. These two bones are located in the wrist, at the tip of the Radius bone in the arm.
Trying to play on the centre of each fingertip is like trying to make certain fingers point away from these bones when curled into the hand. This is an unnatural movement and will create more tension in the hand.
For most people, the natural position is to have the 1st and 4th fingers pointing slightly inwards, whilst the 2nd and 3rd fingers play on the centre of the fingertip. The exact position will depend on the size and build of your hand. The essential point to remember is that not all of the fingers need to contact the string on the centre of the fingertip. It is fine for the 1st and 4th fingers in particular to play more on the edge of the fingertip.


Thumb
The thumb should contact the back of the neck. The padded part of the thumb, where you find the thumb print, does not necessarily have to touch the neck. In fact, if you bend the thumb into you palm, you’ll notice that that it’s the side of your thumb that is closest to your palm. When you bring your hand up to the neck, you’ll notice that the side of your thumb is naturally closer to the neck than the padded part.
Because the side of the thumb is the part that is naturally closer to the neck, it is advisable to use this as your point of contact. Trying to place the padded part of your thumb on the back of the neck will cause your 4th finger to move away from the strings.
The height of the thumb on the back of the neck is different for every guitarist. This is because we all have different sized hands , fingers and thumbs. Generally speaking it should remain within close proximity to the centre of the neck (see shaded blue area in photo). This allows for maximum reach across the fretboard and helps to avoid slipping off the edge of the neck.


Space
To maintain unrestricted movement of the left hand fingers, it is advisable to leave a small space between the hand and neck. In the basic left hand position, the only points of contact your left hand has with the guitar is the thumb (on the back of the neck) and your fingertips (on the strings). This allows your fingers to move freely without becoming rooted on the under side of the neck.
If you root your hand to the under side of the neck, you may have difficulty in reaching the lower strings. It also means you have to bend the fingers a lot to play on the 1st string. This requires more tension, which is to be avoided.
By keeping a small space between hand and neck, you can make small adjustments to reach all of the strings easily. Moving the hand so that it pulls the elbow forward helps you to reach the lower strings. Moving the hand so that it pushes the elbow back can help to play on the higher strings.


Arm & Elbow
The job of the arm and elbow is simply to support the left hand. Neither arm nor elbow should ‘fix’ the position of the hand in place. This leads to excess tension. Excessive tension in any part of the body is something that is to be avoided as far as possible when playing guitar.
One way to think about the arm and elbow is to imagine that your fingertips are fixed in place where they meet the neck. The arm and elbow simply hang in place between the fingertips and the shoulder. Although the actual mechanics of playing the guitar are different (i.e. the arm will be actively engaged as we move), this analogy always helped me to play with minimal tension.

Left Hand Technique
Similarly to positioning, the aspects of technique covered in this lesson are applicable for melodic passages and most other situations. However please note, you may encounter some situations where you will need to adjust this basic technique slightly. These adjustments can be necessary when you are required to fret more than one note at a time or required to make large stretches. I will try and cover these exceptions to the rule in a future lesson.
Direction of Pressure
The direction of pressure should always be towards the fret board. This helps you to play with minimum energy, because your whole effort is being exerted on fretting the note. Scott Tennant covers the importance of economy of effort, economy of energy and economy of motion in his technique manual Pumping Nylon. I strongly recommend you check out his book for more on the ‘economy’ concept.
Playing with minimum energy also allows your finger to quickly move away from the string once it has performed it’s duty. This means you can return to your basic starting position more quickly and be ready to play the next note.
If you press the string towards the fret board, but not at 90 degrees, you risk bending the sting out of tune. If you press the string at 45 degrees to the fret board and push with enough force, the string will slide along the fret. This bends the note higher in pitch.
You should try to exert all pressure towards the fret board as far as possible. The thumb should not be actively pushing against the back of the neck. It’s job is simply to support the neck of the guitar from the other side when the fingers push the strings towards the frets. Think of the thumb as being a brick wall that your fingers push against.


Origin of Movement
The driving force behind the left hand fingers comes from the muscles and tendons in the hand and forearm. Muscles in the forearm pull on the tendons, which run through the wrist and hand.
The main movement and power comes mostly from the knuckle joint (MCP joint). Think of this joint as being the ‘force’ behind the movement.
The job of the smaller joints closer to the tip of the finger (the PIP and DIP joints) is primarily to get the finger into the correct position by contracting or extending as much as required.


How to Fret a Note
When playing an open string there are two points of contact; between the nut and the bridge. It’s possible to change the sound of a string by effectively shortening it’s length. We can do this by ‘fretting notes’ on the guitar. This involves pressing down on the string so that a new point of contact is created between the fret and the bridge, instead of the nut and the bridge.
To get a strong point of contact when fretting a note, it is best to press down directly behind the fret. This creates the largest angle and thus produces a clean sounding note.
Placing the finger further back behind the fret produces a smaller angle. This is sometimes not sufficient enough to create a strong point of contact. The result is that the note can sound ‘muted’ or can ‘buzz’.


Conclusion
Developing a strong left hand technique is one of the most important practice investments a classical guitarist can make. A comfortable, efficient and well-balanced hand position not only improves accuracy and fluency, but also reduces unnecessary tension and helps prevent long-term injury.
It’s important to remember that good technique is not about forcing the hand into rigid positions or striving for perfection overnight. Instead, it’s about gradually building awareness, coordination and consistency through mindful practice. Even small adjustments to thumb/finger position or direction of pressure etc can have a dramatic impact on your playing over time.
As with many aspects of classical guitar, patience is key. Focus on relaxed movement, clean sound production and efficient motion rather than speed. It may also help to focus on one key area at a time, rather than everything covered in this lesson all at once.
If you’d like to continue improving your technique, explore our other guides covering posture, right hand technique, practice habits and common technical mistakes, or consider booking a lesson at Classical Guitar Academy for personalised guidance tailored to your playing.
Guitar Lessons with CGA
If you’re enjoyed this please feel free to check out the other articles on our website for more hints and tips.
If you feel you’d benefit from a more in depth examination of your playing why not take lessons with Classical Guitar Academy? All pupils receive a highly customised programme of study designed to target specific issues they are encountering in their playing.
Book your lesson today!


Great advice. I once heard from a reputable source that the left hand can’t function properly if it is being used to hold the guitar neck up. Is that why classical players use the left knee to support the guitar, so it balances without needing the left hand to hold AND finger?
Absolutely Ryan; the traditional classical guitar position helps to balance the instrument, allowing your left hand the freedom to move without having to grip the neck to keep it balanced. When teaching a new student I always get them to sit with the guitar in the correct position, place the right arm on the guitar and let go with the left hand. This makes it easier when it comes to fretting notes because they do not use the left hand to keep the guitar in place.
As a result of a car accident many years ago, I have limited amount neck movement, and when holding the classical guitar in the recommended position I am unable to see my left hand fingers fretting. My question is this: should a classical guitarist be able to see his fingers on the fretboard,because if the answer is yes I must be holding the guitar incorrectly?
Hi Graham,
Thanks for your comment. Ideally you should be able to just about see your fretting hand fingers. Without being able to see your posture in person, I am unable to offer any specific advice, however from your comments I would guess that you are not tilting your guitar back towards your chest enough.
Try placing your guitar around halfway between your knee and hip on your left leg. Keeping the guitar in this position, try tilting the guitar back until it touches your chest. You should now have a triangle shape; the tips of the triangle being your hip, knee and leg. If you still cannot see your left hand fingers fretting the notes, you may need to adjust the angle of your guitar neck so that it is more parallel with your body (i.e. the neck isn’t pointing too far forward, forcing you to stretch with your left hand). You may well need to make small adjustments to this position to fid the exact right position for your body, however this at least offers you a good starting point.
Ultimately, it’s not essential to be able to see your fretting hand fingers when playing, but it certainly helps. More important is to find a playing position that allows your fingers to move freely without excess tension. It is usually possible to find a position that allows both a visual of the fretting hand and freedom of movement, so it sounds as though you may benefit from experimenting with your position if you haven’t done so already.
As I say, it’s very difficult to diagnose the problem with your posture without meeting for a lesson or seeing a photo/video of you playing, however I hope this small piece of advice helps to point you in the right direction. If you’d like to book a lesson with you me you would be more than welcome. We could explore the issues you’re facing with regards to posture and find a solution that works for you. If there’s anything else I can do please let me know.
All the best,
Ed
HI Ed,
I don’t know exactly how old this article is so I hope I get a response to my question. I am a relative beginner to playing bass, not guitar, but I find a technical conflict when I read about proper fretting technique. I hope you can clear this up. The conflict comes when trying to keep a relatively straight wrist while keeping the same contact points with the tips of the fingers on the string. This is especially prominent when playing 6 or 7 string basses. Physically, it seems that either the fingers must extend to reach the lower strings which would cause more of the pad to contact the string, or the wrist must bend gradually more in order to keep the tips in contact with the string. It seems to me that the later is necessary for a more consistent sound. So my question is, is it one of these two situations or a combination of both?
Thank You,
Larry
Hi Larry,
The article was written back in 2015 but the information within has been shaping my posture and the posture of my students for many years. A lot of the concepts, such as keeping wrists as straight are designed to work in harmony with the natural functions of the human body. I used to teach a doctor who was kind enough to explain the basic functions of the arm, wrist and fingers in terms simple enough for a mere musician to understand. From our conversations, I learnt that when the wrist is bent, the carpal tunnel effectively becomes smaller. This means the tendons (and sheaths they move within) can become squeezed and their movements are therefore restricted and more laborious. A straighter wrist means the tendons have the least amount of resistance to their movements and therefore allow us guitarists to move our fingers more quickly and effortlessly. The bottom line is that keeping our wrists as straight as possible is very important for free movement.
The conflict you mention; keeping a straight wrist while maintaining the same point of contact on the fingertips while fretting notes, is something I’m familiar with. You’re absolutely right in that the fingers must extend to reach the lower strings and contract to reach the higher strings. This can cause fingers to play too flat on the lower strings and can therefore come into unwanted contact with other strings. The solution is to allow your knuckles to move slightly further above the strings when playing on the lower strings so that you are able to fret with more of the fingertip. Allow your elbow to move forwards too so that you can achieve as straight a wrist as possible (although you may still notice some curve). Keeping the elbow ‘locked’ in position will result in a more pronounced bend to your wrist, so let it move. Playing the guitar/bass doesn’t always conform to the ‘ideal’ posture, and we have to compromise often. The goal of this article is to provide a basic position from which to work, however, you may find situations where you have to move from this ideal slightly to certain passages of music, but can return to it when possible. My advice would be to experiment with different amounts of movement for your knuckles and elbow. See if you can find the point where you can place your fingertips on the lower strings while making the smallest adjustment to your basic positioning. The smaller the adjustment to your position, the easier it will be to maintain a consistent feeling technique. Radical changes to your elbow and shoulder are more likely to slow you down, as it takes more energy and effort to move these bigger body parts.
I hope this helps to answer your question. Please do let me know how you get on.
All the best,
Ed
Hello.
Thankyou for this excellent website.
I have followed your advice about left arm/ hand position. I see many experienced players appear to achieve parallel knuckles to the neck.
Unfortunately my hand refuses to do this unless its down in the 10th/11th/12th position.In other positions my index knuckle is closer to the neck than my pinkie knuckle unless I start to twist my wrist.
I can play straightforward pieces but struggle with barred etc .
Any suggestions?
Hi John,
Thanks for your comment. How long have you been working on keeping your knuckles parallel to the neck? The reason I ask is that it can take a long time to make this position feel comfortable. Much in the same way that a gymnast must work on doing the splits. It certainly can’t be done overnight without significant pain, and most likely, significant injury! Fortunately, fretting hand position is not quite as extreme as doing the splits, but the same idea is true; it may not happen overnight.
If you’ve been working on this for many months, the issue may have more to do with your elbow, shoulder or your sitting position. When working on your fretting hand position, it’s important to make sure you’re sitting with the correct posture first. This allows your shoulders to be level and means your arm will have lots of room to manoeuvre freely. Be sure to read this article to check that your overall posture is correct.
Once you’ve checked on your posture, take a look at some of the left hand exercises Scott Tennant suggests in his excellent book ‘Pumping Nylon’. The exercise where you plant your fingers on string 3 and move each finger in turn to another string would be a great place for you to start, assuming you’re experienced with using all 4 fingers of the fretting hand.
I hope this helps and I’d be keen to hear how you get on with any changes you make based on this advice. Please do feel free to post a reply and update me on your progress.
All the best,
Ed
HI,
In order to have my fingers hover over the frets, I have to splay my fingers apart which is very tiring and causes tension in my thumb also. My m and a fingers are especially hard to keep separated. Any advice and/or exercises that you would recommend?
Thanks,
Michael
Hi Michael,
Thanks for your comment. Are you new to the guitar or have you been playing for a while? The reason I ask is that it can take some time for the fingers to become accustomed to the classical guitar playing position. Gymnasts don’t do the box split on day one! If you’re brand new to the instrument, I’d continue to work on opening your hand up and trying to achieve the hand shape described in this article. You may also benefit from placing a classical guitar capo somewhere between frets 3-7 and playing in a higher position where the frets are closer together. This can help you to form good technique in the early stages of learning.
The fact that you’re getting tension in your thumb would suggest that you might benefit from changing the placement of your thumb on the back of the neck. I find a lot of students like to place the pad of the thumb against the neck for grip/security. Unfortunately this makes life difficult for your fingers on the other side. I would suggest using the side of your thumb that’s closest to your index finger (i.e. the ‘inside’ of your thumb, not the ‘outside’) to contact the neck if you’re not doing so already. This can help to put your fingers in a more natural position and alleviate a lot of tension.
I hope this helps. If you’d like some more help with this you’d be very welcome to book a lesson and we can explore this issue in more detail.
All the best,
Ed
Hi Ed
Thank you for the website and wealth of information.
Many years ago I split the nail on my middle finger. Since then it is weak and splits down the middle at the least excuse. I cannot grow it to any length.
can you make any suggestion as to a solution.
Thank you
Hi Les,
I’ve good things about a product called ‘Mane n Tail Hoofmaker’. It was originally designed to strengthen the hooves of horses, but supposedly also works well on fingernails. It might help you to avoid splits in the future. If you give it a try, please do get back to me and let me know how you get on with it. Good luck!
All the best,
Ed
It’s been 3 and a half years since I first picked up the guitar. I’m curious to know if the points you covered in this article are exclusive to playing classical guitar? I decided to go with acoustic guitar, and I want to know if the points in this article are transferable to acoustic guitar, or is the left hand technique and overall guitar position different due to the differences between the two?
A lot of what’s covered here can technically be transferred to acoustic, although you’ll find some things will need to be tweaked. The posture for acoustic guitarists tends to be radically different to classical guitarists. This has an impact on what will feel most comfortable when it comes to positioning and technique. Concepts such as economy of movement/effort still stand, but you’ll probably want to adapt the positioning to suit your acoustic guitar playing.
Good Morning and thank you for all the info contained in this site.
I really enjoy trying to play my guitar. However I have been diagnosed with polymyalgia rheumatica . If I over stretch with my left fingers I get pain from the shoulder down to the base of the left thumb. I am 74 years old, and self isolating due to meds lowering my immune system. I am making some progress playing guitar even though my learning curve appears to be a straight line.
There will be others with similar conditions who will appreciate any advice you can give.
Regards
Bob
Hi Bob,
Thanks for your message. Unfortunately I’m not a doctor so I can’t really give any medical advice. Any guidance offered here comes from a guitar perspective and you should seek help from a doctor who may be able to make recommendations based on the condition.
That being said, you could try out some low or medium tension strings. This would mean you won’t have to apply as much pressure to fret each note. If stretching becomes too much of an issue as a result of polymyalgia rheumatica, you could also look at a guitar with shorter scale length. You can get some really lovely instruments with a shorter scale length that sound just as fantastic as the more “standard” 650mm scale length (not that there is actually a standard size).
If you haven’t done so already, it’s worth devising a gentle warm up routine rather than jumping straight into practicing your pieces. This can help to prime your hands for action and can prevent injury, or in this case aggravating a pre-existing medical condition.
I hope you continue to play and that you begin to see more progress going forwards. Keep in mind that as long as you’re enjoying yourself, you’ve already won.